
The Tascam DR-100MKII is the new field audio recorder acquired by DMA. This blog entry will briefly discuss some of the functionality and features of the unit, specifically what buttons and switches to be aware of on the different sides of the unit.
For this debrief, we will assume that you begin with the side with the display face up. This is the front face of the device. The left side of the device is the bottom face, the right side of the device is the right face and the bottom side of the device is the bottom face. The back face of the device is the side that touches the surface of what you have placed the Tascam on.
The power button is located on the left face of the device. Press and hold the power button to turn the device on. The USB and Power Adapter ports are located on the left face as well. Using a Power Adapter allows the device to operate from a wall socket rather than the batteries.
The front face of the unit contains the display. The most important part of the display is the signal. When recording, the signal and decibel levels will be displayed, and can be altered with distance from the subject or the knob on the side. Holding the Mic closer to the subject will increase the signal, while pulling the Mic away will decrease it. Below the display is an input switch. This allows the user to select what input they wish to use. The XLR input allows the use of an external mic, the UNI input switches to use the Tascam's built-in unidirectional mic, and the OMNI input switches to use the built-in omnidirectional mic. Line 2 is used to attach a line in. The Record button is also located on the front face of the device. Hit the button once to put the device on standby. In Standby, the user can use the Mic to check the signal of the subject. Hit the Record button again to begin recording. Pressing Play/Pause pauses the current recording. Hitting Record again resumes the recording in the same track. Pressing STOP stops the current recording and ends the track.
To listen back to the track you've recorded, press the Menu button and use the circle scroller to scroll to and select Browse. Select the track you want, and press Play in order to play the track.
The right face of the machine has the signal knob. This allows the user to adjust the signal strength and adjust how strong the sound is. Adjust this when necessary, but sometimes altering your position relative to the subject works best. The left face of the display has the headphone/speaker output knob.
The bottom face has the XLR inputs for the unit, where the user can plug in external microphones. The Tascam supports the use of one to two microphones. In between the two plugs, there is a switch between "Mic" and "Line 1." Switch it to Line 1 to record from the mic provided on the device. Choose "Mic" if you have already attached a mic.
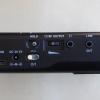
The back face of the unit has a series of switches which alter the functionality of the device. Most users will only need to worry abut the MIC Gainn and +48V switches. The MIC Gain switch adjust the signal level of the recorded sound. It should be adjust to fit the L should be used for loud events. M should be used for sounds such as acoustic music recordings. H should be used for personal, one-on-one interviews and voice recording. The +48V turns on and off Phantom Power, allowing the external mic to use the Tascam's battery power. Make sure that the +48V switch is turned off when plugging and unplugging an XLR input, as not to damage the unit. Note that using Phantom Power will drain the unit's batteries faster, but may increase the quality of the audio recording. Never use Phantom Power while you're using an external ribbon microphone.
Comments
Well said, Tristan. I would add that the user should always switch off phantom power when finished. Plus, NEVER use phantom power with an external ribbon microphone.
This is a helpful visual to get acquainted with the Tascam DR 100:
http://www.youtube.com/watch?v=_OcbfBm25yM
Post new comment