
This blog post will explain equipment use, scene setup and good interview practices when engaging in in-field audio recording.
KNOW YOUR RIG
A rig is the common term for your recording gear. It usually consists of a recording unit, a mic, headphones and any other peripherals needed.
While DMA will be purchasing its own rig, it will help to know what a quality rig looks like. Here's a look at a rig with equipment that could buy from a website like B&H:
audio recording unit, like a flash recorder-directly to hard disk
extra flash cards, like compact flash cards from lexar.
pen and pencil for notes- don't forget!
headphones- 100.00 standard- Sony Sig MDR-V6
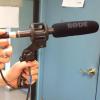
Rhode N2- shotgun. Audio Technica A-22.
Wind sock /Softy - Used to block the wind from ruining the recording
Pistol grip for mic - use the grip, sitting down, and only recording for
half-hour to 3 hours max
New and Used plastic baggies for batteries.
USB cord for downloading.
Manual for audio recorder
Talent Releases.
Any information about the project you're working on that you can hand to people.
Power is a big deal in field recording. Know that there are two ways to power your audio recorder, via an AC adapter or using batteries. However, these units are often battery hogs. The Marantz that Jesikah requires 8 AA batteries to run. Similarly, there are two ways to power your mic. Using phantom power, siphoning power directly from your audio recording unit, or by inserting a AA battery into the mic itself. The amount of battery life you get depends on how long you record for and whether or not you use phantom power.
Tip: For best results, don't mix and match batteries. Stick to batteries of one type or brand at any given time.
KNOW YOUR MIC
Establish what type of mic you have. Depending on what sort of mic, the sound will be picked up. Using the DMA rig, you will probably be using an audio-technica shotgun mic. This type of mic will pick up sound in a cardiod (hear like shape). The sweet spot of the mic will be at the tip of the heart, and thats where your subject should be.
Most mice have a roll-off symbol just above a switch. You will probably want to keep this on, as it "rolls off low frequency," similar to a filter. Keeping this on will solve some problematic audio, like the low hum of machines in the distance. However, it will sometimes the sound of individuals with lower voices, so be weary.
For longer interviews, you will want to bring a boom pole. Even though mice are light, your arm will get soar after a certain period of time. Boom poles allow you to prop your mic up on the ground or against a surface to alleviate some of the strain.
KNOWING AND SETTING UP YOUR SCENE
For most interviews, it helps to have two chairs angled next to each other. The chairs should be next to each other, so your knees don't touch. This allows you to get the mic close to the subject. Mic placement is important, as it affects the quality of sound that you can capture. You always want to mic the sound source, not around the source. You generally want 45 degree from the sound source to the mic. This is where it helps to know how your mic pics up sound. Compared to video, you can have your mic much closer, as you don't need to worry about having it in the shot. Make sure that the mic is never farther than an arms length away from the source, and the subject is not talking downwards, but into the mic.
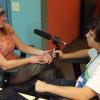
Always hold a loop of the mic cord in your hand, as the mic and cable connection is the most sensitive part of the rig, and has the potential to make the most noise.
When recording a subject doing something in the field, try to record it three times:
1. Just talking to you- "walk me through it"
2. Now have them just do the activity.
3. Have them do the activity, while telling you what they're doing.
You should use XLR cables exclusively.
Make sure to adjust your signal, making sure that you pick up your subject at a proper level. This can be achieved with the signal knob on the audio recorder unit. DO NOT mix this up with your headphone volume. A common pitfall is adjusting your headphone volume to make the subject sound alright, but the actual recording would not reflect these changes.
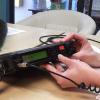
Always make sure the numbers on your recording unit are running to ensure that the audio is being recorded.
RECORDING PROCESS:
1. Close your eyes and do a 360 of the room. Listen for any noise that may be problematic and either move it or your setting.
2. Always slate your interview. State the date, time and subject of your interview at the beginning of the clip
2. Get a sound check, to check the signals of your interview
3. Always have your headphones on. Even though the signal may look good, it may not sound good.
5. Make sure you aren't on standby- blinking lights usually mean standby. Solid lights usually mean recoring.
6. You want to be between -12 and -6. with level.
7. Always do a sound check to make sure that everything sounds up to snuff.
Recording a Slate:
Where you are?
Who you with and what you are doing? what you are focusing on?
What's the date?
These can be recorded at the beginning or the end.
Always record room tone. Record thirty seconds of silence to use in editing. This allows you to edit and remove sound, while replacing it with silence from the room. Different room silence sounds different.
If you can, record some sounds of the activities or the surroundings to throw into the final copy of your interview.
Some Final Tips:
-Ask open-ended questions. Avoid yes or no questions.
-Be careful of squeaky chairs, clocks, dogs and refrigerators. Alter the surroundings if necessary, but always put everything back at the end.
-If any noise pops out of nowhere, be sure to record it to insert into the interview. This will help make the interview sound uniform throughout.
-Tell them exactly what you are doing, to make them feel more comfortable.
Post new comment