Blogs

Tascam Field Recorder Debrief - Part 1

The Tascam DR-100MKII is the new field audio recorder acquired by DMA. This blog entry will briefly discuss some of the functionality and features of the unit, specifically what buttons and switches to be aware of on the different sides of the unit. 

For this debrief, we will assume that you begin with the side with the display face up. This is the front face of the device. The left side of the device is the bottom face, the right side of the device is the right face and the bottom side of the device is the bottom face. The back face of the device is the side that touches the surface of what you have placed the Tascam on.


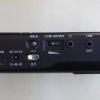
The power button is located on the left face of the device. Press and hold the power button to turn the device on. The USB and Power Adapter ports are located on the left face as well. Using a Power Adapter allows the device to operate from a wall socket rather than the batteries.

Field Recording


This blog post will explain equipment use, scene setup and good interview practices when engaging in in-field audio recording.

KNOW YOUR RIG

A rig is the common term for your recording gear. It usually consists of a recording unit, a mic, headphones and any other peripherals needed.

While DMA will be purchasing its own rig, it will help to know what a quality rig looks like. Here's a look at a rig with equipment that could buy from a website like B&H:

audio recording unit, like a flash recorder-directly to hard disk

extra flash cards, like compact flash cards from lexar.

pen and pencil for notes- don't forget!

headphones- 100.00 standard- Sony Sig MDR-V6

Rhode N2- shotgun. Audio Technica A-22.

Wind sock /Softy - Used to block the wind from ruining the recording

Pistol grip for mic - use the grip, sitting down, and only recording for

half-hour to 3 hours max

New and Used plastic baggies for batteries.

USB cord for downloading.

Manual for audio recorder

Talent Releases.